Federico Dossena
Home
Projects
Blog
About me
Introduction
Let's start by answering an obvious question: why would you want Mesa3D on Windows?
The answer is simple: old software. You see, sometimes old apps and games that use OpenGL do not work on modern systems because the implementation of older OpenGL versions in modern video drivers (especially AMD's) is dreadful. Mesa3D comes with a software renderer, which means it can run those applications by emulating OpenGL on the CPU. Of course, it's slow, but it's fast enough to play Quake 3 and Star Trek Voyager Elite Force (on an i7), so that's good enough. It's also good if you have an old GPU that doesn't support modern OpenGL.
Please excuse me if I'll refer to Mesa3D, Gallium, Gallium, LLVMpipe, etc. simply as "Mesa".
For this tutorial we need:
- A really fast CPU
- 4GB of RAM
- 30GB of disk space
- Windows 10 x64, fully updated. I seriously recommend using a virtual machine, as we'll be making a bit of a mess in the system.
- 7-Zip or another archive manager (Winrar, etc.)
- A few hours to spare
Preparation
We will need the following things to build LLVM first and then Mesa:
- Visual Studio 2019 with C++
- Win flex-bison
- Python 2.7 64bit with pip, mako, setuptools, scons
- pywin32 64bit for Python 2.7
- CMake for Windows x64
Visual Studio
We will be using Visual Studio 2019 Community Edition, which is free and can be downloaded from Visual Studio website.

Run the installer and select Desktop development with C++. Nothing else is required. This will take a while to download and install.

Win Flex-Bison
Download Win flex-bison.

Make a new folder in your C drive called winflexbison and extract the downloaded archive into it using 7-zip.


Press start and type "Environment variables", select Edit the system environment variables, and click Environment variables (at the bottom).
In the system variables, select PATH and click Edit.
Add C:\winflexbison at the end and press OK.


CMake
Download CMake for Windows x64.

Choose to add CMake to the system PATH for all users, and create the desktop icon.

Python
Go to the Python website and get the latest version of Python 2.7 64bit.


Run the installer and choose to install Python to all users and to add it to the PATH variable.

Pywin32
Go to the pywin32 github page and get the latest release for Python 2.7 64bit.


Install the downloaded file.

Mako, setuptools, scons
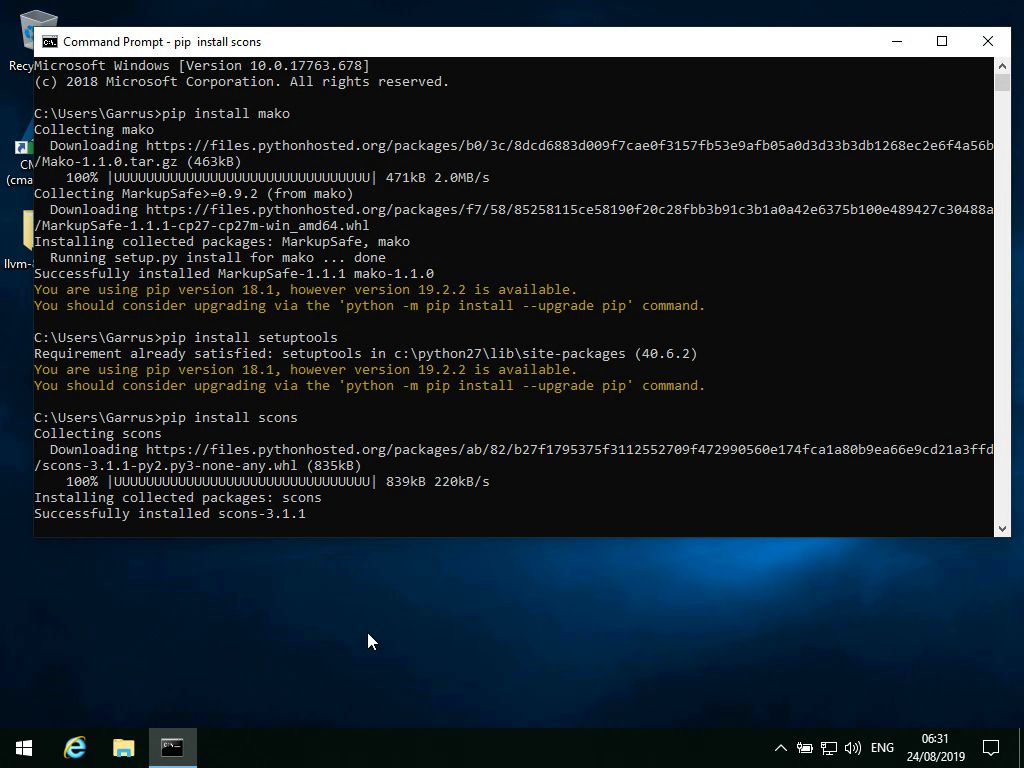
Press start, type "command prompt", and run it (not as administrator). Type the following commands:
pip install mako
pip install setuptools
pip install scons
pip install setuptools
pip install scons
Building LLVM
Get the LLVM source code tar from their website and extract it to your desktop using 7-zip.


Run CMake from the shortcut on your desktop, select the LLVM source directory for the source code, and a new llvmbuild directory on your dekstop for the binaries.
It will look like this:

Now use the Add Entry button and add the following parameters that tell LLVM what the target system is.
Be careful when copying them. It is case sensitive, and do not add spaces by accident.
| Name | Type | Value (64 bit builds) | Value (32 bit builds) |
|---|---|---|---|
| LLVM_DEFAULT_TARGET_TRIPLE | STRING | x86_64-pc-windows-msvc19 | i686-pc-win32 |
| LLVM_HOST_TRIPLE | STRING | x86_64-pc-windows | i686-pc-win32 |
| LLVM_TARGETS_TO_BUILD | STRING | X86 | X86 |
| LLVM_TARGET_ARCH | STRING | x86_64 | i686 |
| LLVM_USE_CRT_DEBUG | STRING | MTd | MTd |
| LLVM_USE_CRT_RELEASE | STRING | MT | MT |
When you're done and it looks like this, press Configure.

It will ask which version of Visual Studio you're using and which platform. Select Visual Studio 16 2019, and x64 for 64bit builds or Win32 for 32bit builds.
It will take a few minutes.

When it's done, it will add a bunch of parameters of its own. Click Generate and wait a few seconds.

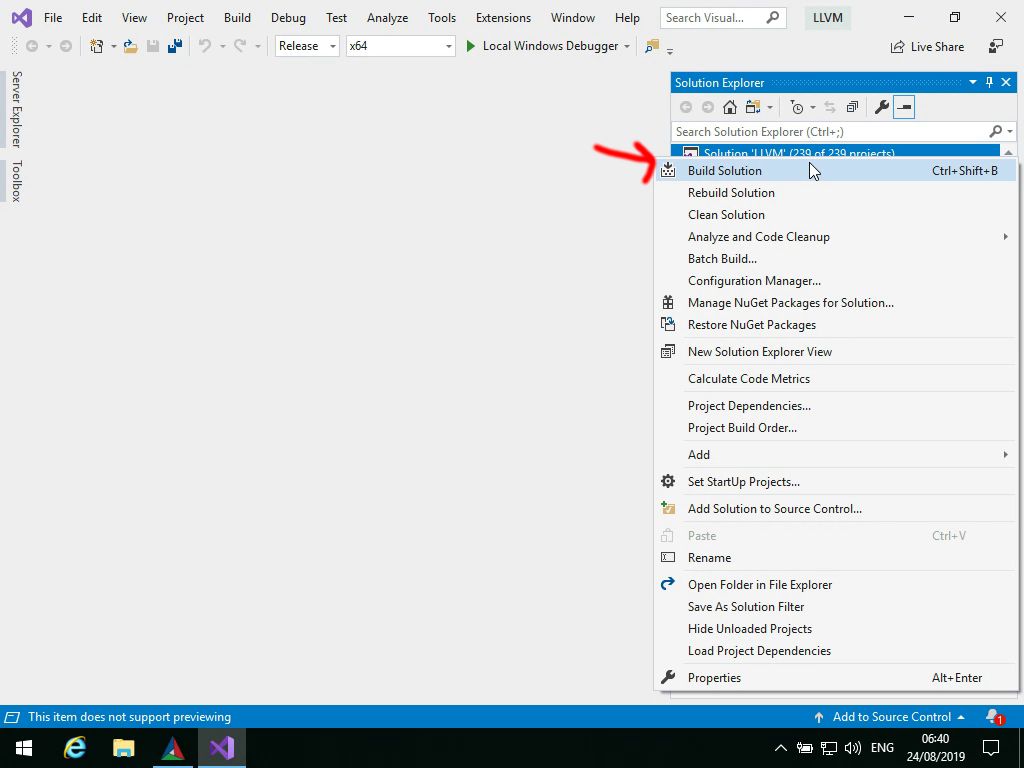
Click Open Project to load the project in Visual Studio.

It will take some time to load. When it's done, select Release for compiling. It will take some time to switch.

Right click the LLVM solution and select Build Solution.
This process takes about a hour. Perfect time to watch a Star Trek episode while sipping a nice cup of Earl Grey.

Now that LLVM is ready, we need to move some files. Be very careful here as it's easy to get wrong:
- Open llvmbuild\Release and copy the lib folder to the llvmbuild folder, overwriting the existing files (if any)
- Open the LLVM source folder and copy the include folder to the llvmbuild folder, overwriting the existing files (if any)
Now open the Environment Variables again and add a new system variable called LLVM, that points to the llvmbuild directory on your desktop.

LLVM is now configured and ready. If you plan to build Mesa on this machine again, you will not need to repeat these steps.
Building Mesa
Download the latest Mesa source tar from their website and extract it to your desktop using 7-zip.


To get better performance in games that use the S3TC texture format, open the Mesa folder, edit src\gallium\drivers\llvmpipe\lp_tex_sample.h and set LP_USE_TEXTURE_CACHE to 1.


Go back to the Mesa folder on your desktop, select File and run PowerShell (not as administrator).

For a 64 bit build, use this command:
scons platform=windows build=release platform=x86_64 libgl-gdi
For a 32 bit build, use this command:
scons platform=windows build=release platform=x86 libgl-gdi
Watch the rest of your Star Trek episode, and when it's over it should be done compiling.
Inside the Mesa folder, browse to build\windows-x86_64\gallium\targets\libgl-gdi (64bit build) or build\windows-x86\gallium\targets\libgl-gdi (32bit build), and here you will find opengl32.dll. This DLL is Mesa.

And there you have it, Mesa on Windows!


Credits
Thanks to Lorenzo "lowenz" Donizetti for figuring out some of the cryptic stuff going on with LLVM.